Friday, May 25, 2012

TOP 10 EASY TRICKS TO SPEED UP WINDOWS XP INSTANTLY


            Windows XP performance can be easily improved just by applying several tweak on its default setting. With the following easy trick we are looking for a significant performance improvement without having to upgrade or buying additional software. With a little bit of preparation and following the steps carefully you can improve the performance almost instantly. Here are top 10 easy tricks for improving windows xp performance.

Tip # 1: Defrag your hard drive

This rearranges files so the hard drive doesn’t have to look for longer then necessary to find files.
Ø      Select “Start” from Desktop
Ø      Select “Accessories”
Ø      Select “System tools”
Ø      Select “Disk Defragmenter”
This process may take a few minutes to a few hours depending on how long the period since you did it in the past. As an alternative you can use JK defrag which is smaller but more efficient than Microsoft Disk Defragmenter program. It is free software and it can even defrag your computer when it’s idle, saving you precious time.

Tip #2: Disable Indexing Services

Indexing is a service running in the background which was intended to speed up searching. However if you don’t use searches function regularly disabling this service may speed up your computer significantly, because the indexing program using a lot of resources.

To disable this service;
Ø      Select “Start” from Desktop
Ø      Select “Settings”
Ø      Click on “Control Panel”
Ø      Double Click the “Add/Remove Programs” icon
Ø      Select the “Add/remove Windows Components” tab on the left hand side
Ø      Find and uncheck “Indexing Services”.

Tip #3 : Adjust Page file size
Page file size is used by all currently running programs and by default, windows constantly adjusting the page file size to ensure enough free space on RAM. Making page file size fixed also saves the windows from having to constantly adjust the size. This can also improve performance.

To change the size of your page file:
Ø      Right click “My Computer”
Ø      Select “Properties”
Ø      Select “Advanced” tab
Ø      Select “Settings” button under “Performance”
Ø      Select “Advanced” tab again
Ø      Select Change under “Virtual Memory”
Ø      Click on the drive containing your page file
Ø      Change the size. (I recommend increasing it- having it fixed at the same default size still helps)

Tip #4: Remove Unused Fonts
Having many fonts on your computer can slow down performance because they use more system resources. Keep only fonts which you needed regularly and delete the rest out of the folder. To delete fonts, follow these instructions;
Ø      Open “Control Panel”
Ø      Select “Fonts” icon
Ø      Delete or move fonts to a temporary back-up folder

Note:  I recommend moving fonts to a temporary folder so that if you want to recover them then it can be done easily.

Tip #5: Remove Desktop Picture
Your desktop background uses system resources; if your happy to live without then it may help improve performance of your computer. Remove it by;
Ø      Right-Clicking the Desktop
Ø      Select “Properties”
Ø      Select “Desktop” Tab
Ø      Select “None” from the drop down box under Background Window
Ø      Click “Apply” and “OK”.

Tip #6: Check NTFS file system is being used

NTFS system is more secure and faster then FAT32. I suggest changing your disk to NTFS if it is currently FAT32.

Check your computer is using NTFS by;
Ø      Double-click “My Computer”
Ø      Right-click the C: drive
Ø      Select “Properties”
Ø      Examine the “File System Type”
Ø      To Change to NTFS
Ø      Backup any important data on a different PC or Disc.
Ø      Select “Start”
Ø      Select “Run”
Ø      Type in “cmd”
Ø      Click “OK”
Ø      In Command Prompt type in “C: /FS:NTFS”
Ø      Press “Enter” and leave until completion.

Tip #7: Uninstall Unnecessary Software
Anything taking up memory on your hard drive unnecessarily is slowing your computer down. To remove programs from your machine follow these steps;
Ø      Select “Start”
Ø      Select “Control Panel”
Ø      Select “Add/Remove Programs”
Ø      Remove desired programs.

Tip #8: Disable Unwanted Start-Up Programs
Lowering the amount of programs that start up when the computer is booted can increase speed, period. To do this follows these steps.
Ø      Select “Start”
Ø      Select “Run”
Ø      Type in “msconfig”
Ø      Select the “Startup” tab from the new window
Ø      Scroll down viewing each programs description and disable those you don’t need.
Ø      Select “Apply” or “OK”. The computer will require a restart.

WARNING:   Be careful disabling certain programs can be harmful to the computer I would suggest leaving any drivers and anti-viruses/firewalls to start up as they desire.

Tip #9: Disable Error Reporting
This “feature” calls home to Microsoft and sends info about system errors. By disabling Error Reporting you can free up system/network resources. To disable the program follow these steps;

To access the settings for the reporting feature:
Ø      Click Start.
Ø      Right-click My Computer, then click Properties.
Ø      Click the Advanced tab.
Ø      Click Error Reporting.
Ø      check the box that says Disable Error Reporting
Ø      uncheck the box that says But notify me when critical errors occur.
Ø      click OK to close the window.

Tip #10: Turn Off System Sounds
What this does is disable the Sound Scheme. The sound scheme contains things like the sound you hear when you click on something. By turning sound scheme off you can free up system resources. Follow these steps;
Ø      Go to Start
Ø      Go to Settings > Control Panel
Ø      Click Sounds and Audio Devices then Click on the Sounds tab
Ø      Save your current scheme, click on the Save As… button, enter a name, and click OK.
Ø      Next, in the upper most box, click on the arrow on the right side and choose No Sounds
Ø      Click Apply at the bottom, right.
Ø      If you still need more performance improvement then the easiest way is doubling the computer RAM capacity.

Wednesday, April 25, 2012

How To Change Windows 7 Logon Screen Using Registry?


No Third party software utility is needed to change Windows 7 Logon Screen as we do in Windows Xp. I have already explained in detail on How to change Windows Xp Logon screen in, Top 10 ways to Tweak your Windows Xp. Customizing Windows 7 is much easier when compared to earlier versions by doing some Registry hacks. ;) In this article I will show you how to change Windows 7 Logon Screen using registry hacks in simple steps.
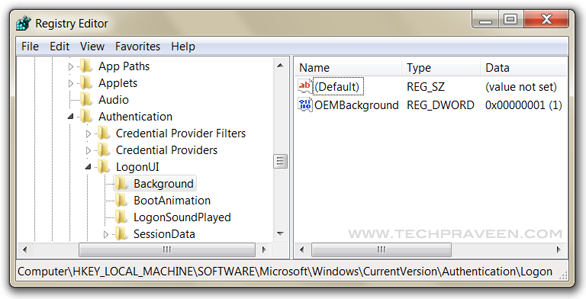
Steps to Change Windows 7 Logon Screen

1. Press Windows Key + R to launch Run. Type REGEDIT and hit enter.
2. Now navigate to,
HKEY_LOCAL_MACHINE\SOFTWARE\Microsoft\Windows\CurrentVersion\Authentication\LogonUI\Background
Change value of OEMBackground to 1.
Customize Windows 7 Logon Screen using Registry
or
Alternatively you can download the Registry file from here.Extract the file and double-click on the file to enable this feature (Alternative method: right-click, select Merge).
4. Now navigate to C:\Windows\System32\oobe, create folder “info”, double click it and create another new folder “backgrounds”.
5. Now place your desired picture inside logon file into C:\Windows\System32\oobe\info\backgrounds. In my Windows 7 I use Alienware themes so changed Windows 7 Logon Screen with Alienware picture.
Windows 7 Logon Screen Background Image
6. Rename the file to backgrounddefault.jpg. (Please NOTE: Images must be less than 256kb in size).
7. Press Windows Key + L to view your customized Logon Screen. Else Reboot your Windows 7 to apply changes.

Download Windows 8 Consumer Preview


Download Windows 8 Consumer Preview

Windows 8, the latest  Microsoft’s operating system brings an innovative new platform and tools to developers. Windows 8 apps can use a broad set of new libraries and controls, designed for fluid interaction and seamless connectivity. Apps can add new capabilities to Windows and to other apps, connecting with one another through the new interface.
Windows 8 Consumer Preview Setup will check to see if your PC can run Windows 8 Consumer Preview and select the right download. Setup also features a compatibility report and upgrade assistance. Built-in tools for creating an ISO or bootable flash drive are available for some previous versions of Windows (excluding Windows XP and earlier).

Key Features of “Windows 8 Consumer Preview”:

Touch-First User Interface:
  • Metro style – Windows 8 introduces a new Metro style interface built for touch, which shows information important to you, embodies simplicity and gives you control. The Metro style UI is equally at home with a mouse and keyboard as well.
  • Touch-first browsing, not just browsing on a touch device - Providing a fast and fluid touch-browsing experience, Internet Explorer 10 puts sites at the center on new Windows 8 devices.
More Ways to Engage With Powerful, Connected Apps:
  • Powered by apps - Metro style apps built for Windows 8 are the focal point of your experience, filling your entire screen so there are no distractions.
  • Apps can work together – Apps communicate with each other in Windows 8. For example, you can easily select and email photos from different places, such as Facebook, Flickr or on your hard drive.
  • Your experience syncs across your devices - Live roams all the content from the cloud services you use most — photos, email, calendar and contacts — keeping them up-to-date on your devices. With SkyDrive, you can access your files, photos and documents from virtually anywhere with any browser or with Metro style apps in Windows 8.
Enhanced Fundamentals:
  • The best of Windows 7, only better - Windows 8 is built on the rock-solid foundation of Windows 7, delivering improvements in performance, security, privacy and system reliability. Windows 8 reduces the memory footprint needed – even on the lowest-end hardware – leaving more room for your apps.
  • Preserving power-user favorites and making them better - For those who push the limits of their PC, Windows 8 features an enhanced Task Manager and Windows Explorer and new, flexible options for multimonitor setups.
New Developer Opportunities:
  • Windows Store - The Windows Store will allow developers to sell their apps anywhere Windows is sold worldwide, whether they’re creating new games or familiar productivity tools.
  • Build using more languages – Windows 8 lets you leverage your existing skills and code assets to create great experiences using the programming language you prefer.
  • Rich hardware integration leads to richer experiences, particularly for games – DirectX 11 gaming power underlies Windows 8, allowing the easy creation of full-screen games with smooth, flicker-free action
    .

Sunday, April 22, 2012

Office Password Recovery Utility


If you want to keep your Microsoft Office documents away from unwelcomed eyes, a good idea is to password-protect them. But what if you lose the password? Don’t worry. Petri has come up with a neat little tool to recover a password protectedMicrosoft Office document. Office Password Recovery Utility lets you decrypt Microsoft Office Word, PowerPoint, Outlook and excel passwords in a blink. The Office Password Recovery Utility saves you from hours of unneccesary work – re-writing doucuments that could be easily be recovered…

How many times have you lost or forgottenpassword? In my case, hundreds. If you forget an online password, it can easily be recovered by sending a link to your email. Even your primary email address has options for easy password recovery. But Microsoft Office doesn’t. That’s where this software comes in handy.
It can’t be more simple. Download and run the Office Password Recovery Utility, open the file you want to recover and press a button. It adds the file to the “Working” folder, and after a bit of time, depending on the size of the file, it is moved to either the “Failed”, or in most cases, the “Recovered” folder.
At only $89, Office Password Recovery is a good thing to have in your office. You’ll need it.

Friday, February 24, 2012

10 Google Search Tricks - SATYAM SRIVASTAVA


  1. Use the “site:” operator to limit searches to a particular site. I use this one all the time, and it’s particularly handy because many site’s built-in search tools don’t return the results you’re looking for (and some sites don’t even have a search feature). If I’m looking for WWD posts about GTD, for example, I could try this search: GTD site:webworkerdaily.com.
  2. Use Google as a spelling aid. As Rob Hacker — the WWD reader I profiled last week — pointed out, entering a word into Google is a quick way to see if you have the right spelling. If it’s incorrect, Google will suggest the correct spelling instead. Additionally, if you want to get a definition of a word, you can use the “define:” operator to return definitions from various dictionaries (for example, define: parasympathetic).
  3. Use Google as a calculator. Google has a built-in calculator — try entering a calculation like 110 * (654/8 + 3). Yes, your computer also has a calculator, but if you spend most of your day inside a browser, typing your calculation into the browser’s search box is quicker than firing up your calculator app.
  4. Find out what time it is anywhere in the world. This one’s really handy if you want to make sure that you’re not phoning someone in the middle of the night. Just search for “time” and then the name of the city. For example, try: time San Francisco
  5. Get quick currency conversions. Google can also do currency conversion, for example: 100 pounds in dollars. If you would like to convert minor currencies, be sure to be specific about the country. So, if you want to find out how many nuevos soles your dollars might buy, you could try: 100 dollars in Peruvian nuevos soles.
  6. Use the OR operator. This can be useful if you’re looking at researching a topic but you’re not sure which keywords will return the information you need. It can be particularly handy in conjunction with the “site:” operator. For example, you could try this search: GTD OR “getting things done” site:webworkerdaily.com
  7. Exclude specific terms with the – operator. You can narrow your searches using this operator. For example, if you’re looking for information about American Idol but don’t want anything about Simon Cowell, you could try: “american idol” -cowell
  8. Search for specific document types. Google can search the web for specific types of files using the “filetype:” operator. If you’re looking for PowerPoint files about GTD, for example, you could try: GTD filetype:ppt
  9. Search within numerical ranges using the .. operator. Say, for example, you want to look for information about Olympic events that took place in the 1950′s, you could use this search: Olympics 1950..1960
  10. Area code lookup. Need to know where a phone number is located? Google will let you know where it is, and show you a map of the area, too. For example: 415

Thursday, January 26, 2012


Installing Windows 7 From USB Drive 3 Steps Easy Process

I'm going to list below 3 easy options for you to put the ISO image of your Windows 7 copy onto a USB stick, then install Windows 7 to your computer from your USB stick instead of burning a DVD and wasting a disc. Installing from a USB drive shaves a few minutes or so off the install time. 


IMPORTANT NOTES:

-Make sure your motherboard is capable of booting off a USB stick or this will not work
-Backup any files on your USB stick because it will be formatted
-Make sure your USB stick is big enough to fit the Windows 7 ISO image
-If you are having trouble booting off your USB stick, make sure it is the first item listed in your boot order located in your BIOS settings

-Also, this is important so remember this, after you boot from your USB key and it copies the Windows 7 files over and installs them, it will restart your computer to finish the setup, right after it finishes this screen shown here http://tinyurl.com/yeptj7mit will reboot. Make sure you unplug your USB key from your computer on the first restart so it doesn't boot off your USB key again and start the installation process over.


1st Option - Microsoft's Official Tool (Try This First)

Download Microsoft's official tool to install Windows 7 from your USB stick, the tool was removed from Microsoft's website for a short time because evidently the tool violated the GNU’s General Public License (GPL) for using open source code, but Cnet has the file hosted. *UPDATE* Microsoft now has the tool listed on their website again. Links below:

http://download.cnet.com/Windows-7-U...?tag=mncol;pop

*UPDATE* The tool can now be downloaded again from the MS Store:

http://images2.store.microsoft.com/p...B-DVD-tool.exe


2nd Option - Use Unetbootin

Follow the guide in the link below to use Unetbootin to Install Windows 7 from your USB drive, Unetbootin doesn't install anything to your computer unlike UltraISO, so I would use unetbootin if the 1st option above does not work for you.

http://www.addictivetips.com/windows...-simple-steps/


3rd Option - Use UltraISO 


1) Download the free UltraISO trial by clicking on this
2) Start UltraISO as administrator
3) "Burn" the iso image to the USB stick by following these steps

With UltraISO:
- Open the image of Vista/Win7 with UltraISO
- Under BOOTABLE tab choose WRITE DISK IMAGE
- Choose your USB stick under "Disk Drive"
- Choose a method (It's recommended to use USB-HDD+)
- Press Write
- Make sure to change your BOOT order in BIOS to boot from your USB drive first

Friday, October 7, 2011

Make a donation

You can make a donation for better 
continues posting by using paypal 
paypal ID - satyamsrig@gmail.com


Thank You


SATYAM SRIVASTAVA
Computer Programmer

Friday, September 2, 2011

How to change your Windows XP product key without reinstalling


Windows XP Logo
This tutorial explains how to change your windows xp product key / xp serial / xp license without using software or reinstalling. To do this you need to edit the registry to deactivate windows, then run msoobe.exe to enter your new product key.
You can download software to help you do this, but that’s for girls. Real men do it this way…
1. Run regedit and drill down to:
HKey_Local_Machine\Software\Microsoft\WindowsNT\Current Version\WPAEvents.
Select WPAEvents then on the right double click “OOBETimer” and change at least one digit of this value to deactivate windows.
2. Choose run from start menu and type this command in the run box:
%systemroot%\system32\oobe\msoobe.exe /a to get the Activate Windows wizard, select “Yes, I want to telephone a customer service representative to activate Windows”, click next.
3. In the next screen click the “Change Product Key” button.
4. Now enter your new product key, click the update button, close the wizard and reboot. Please note the XP product key FCKGW-RHQQ2-YXRKT-8TG6W-2B7Q8 in the image below will not work. This is the “corporate” key used by pirated versions of windows and has now been blacklisted by Microsoft.
5. When your computer restarts,  enter the command in step 2 to verify windows is activated and you should see “windows is already activated”.
Changing your xp key is perfectly legal if you have a valid key. You can even automate the process with a visual basic script which you can find on Microsoft’s website.
Update: If you click the link to Microsoft above you will now find the following message:
Warning The steps in the article are effective only on Volume License media. If you try these steps on OEM media or on retail media, you will not change the product key.
But unless something has changed this just isn’t true. I have used the visual basic script they provide to change both OEM and retail media keys and it worked just fine.